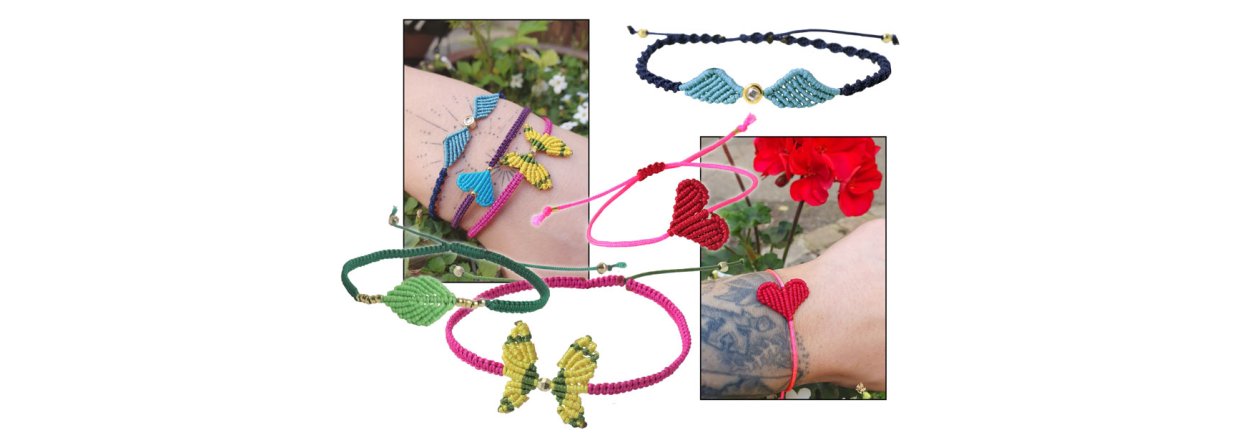
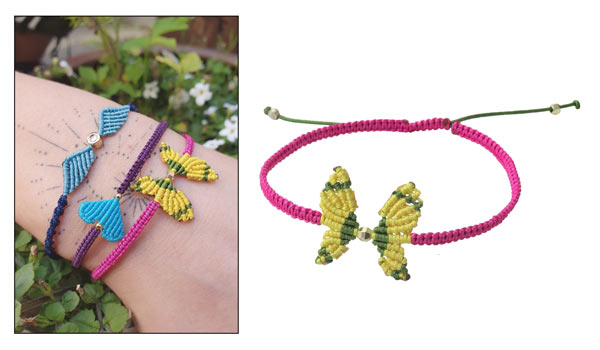
In this blog post, we show you how you can make variations of the traditional macramé bracelet yourself. We used polyester cord to knot our examples of different motifs. The bracelets can be made with cord in any thickness, and the bracelet itself can be tied simply or with beads. The motifs can also be used in many other ways, for example as pendants in earrings or necklaces or as Easter or Christmas decorations.
We used a plastic and metal braiding board to tighten the centre cord, but you can also use a cheaper foam macramé knot board.
See also Smyks' previous blog post Macramé bracelet or the DIY guide Knotted macramé bracelet
Have a great time!
 |
 |
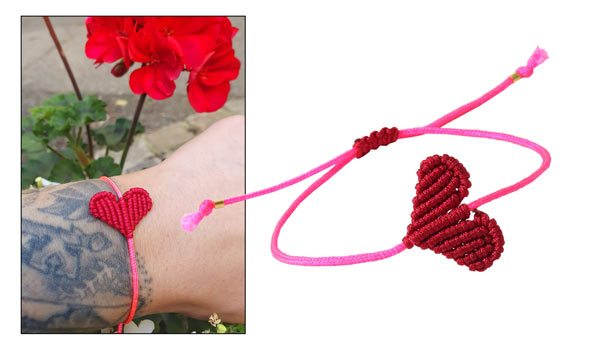
| Macramé Heart | Macramé Angel Wings |
 |
|
 |
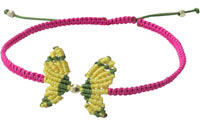 |
| Macramé Leaf | Macramé Butterfly |
|
|
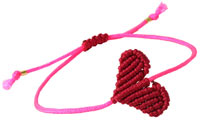
Macramé Heart
We used the following DIY components to make this bracelet:
Nylon cord, 1.5mm, pink, approx. 30cm
Nylon cord, 0.9mm, red, approx. 2m
Crimp beads, 2x2mm, gold-plated
+ Scissors
+ Lighter
Cut 6 x 30cm red cord to size.
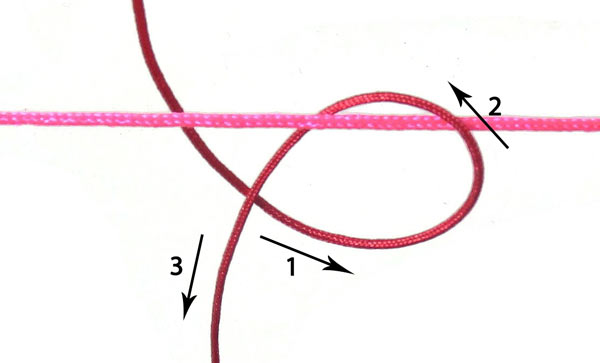
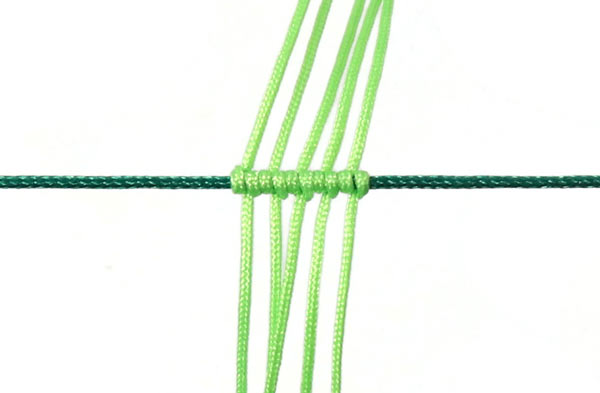
Stretch the pink cord as centre cord on the braiding or macramé board. Take a red cord and place the middle of it underneath the centre cord. Coil the red cord around the centre cord as shown in the picture. From now on, we will call this a half knot.
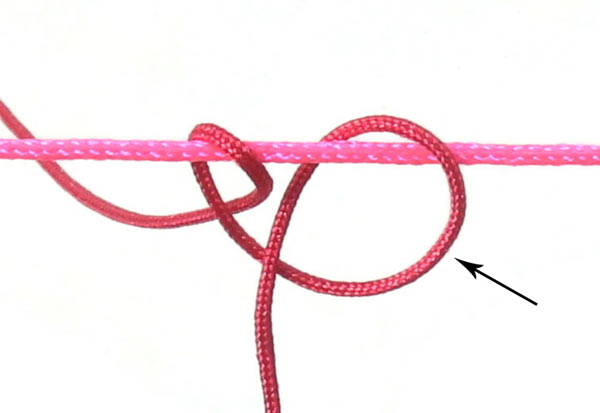
Tie another half knot in the same way.
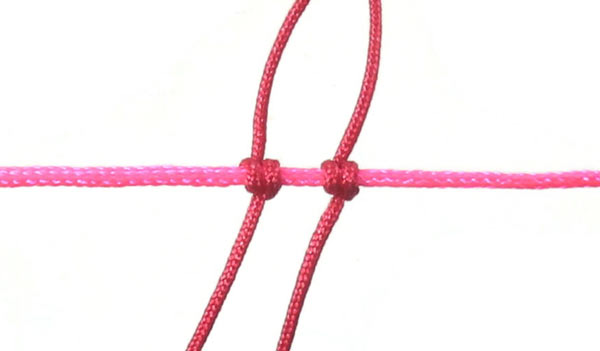
Tighten the cord. Once you have tied 2 half knots with the same cord, the cord is fastened and looks like in the picture. From now on, we will call 2 half knots a double knot. Take the next red cord and tie a double knot in the same way.
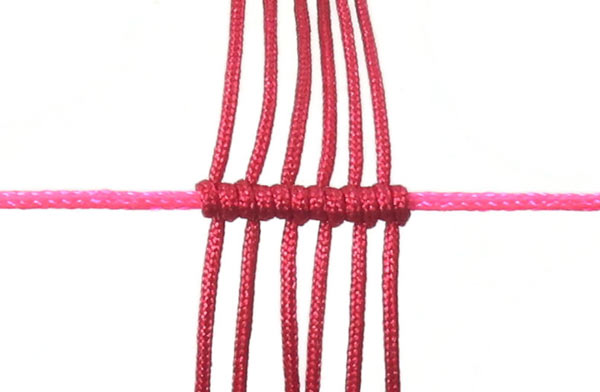
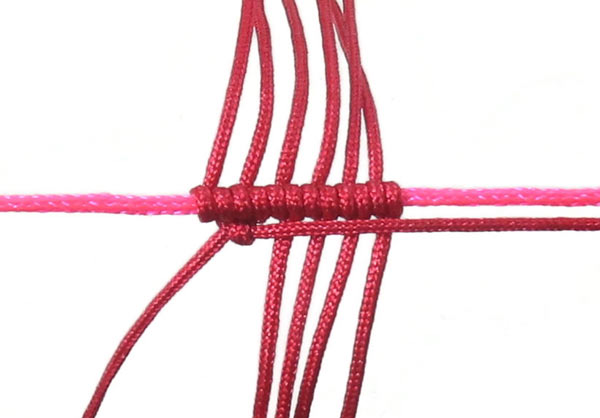
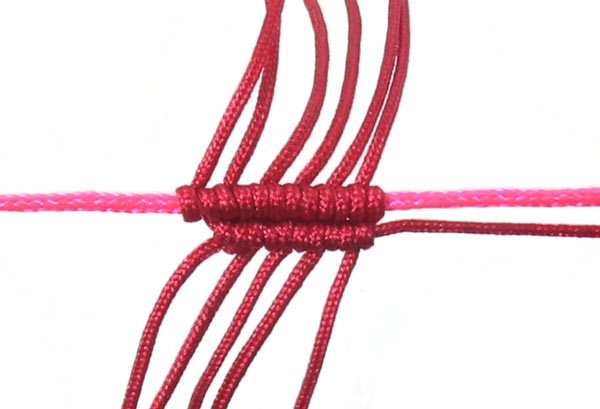
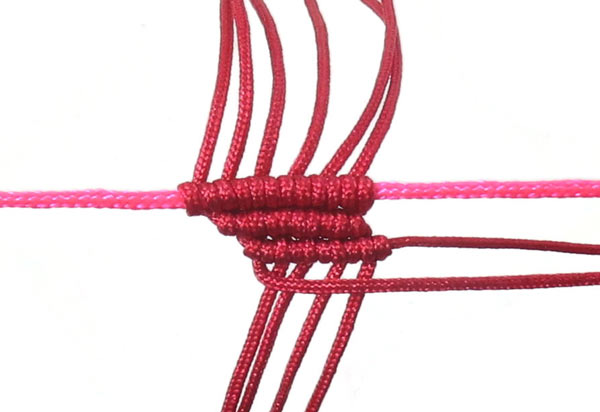
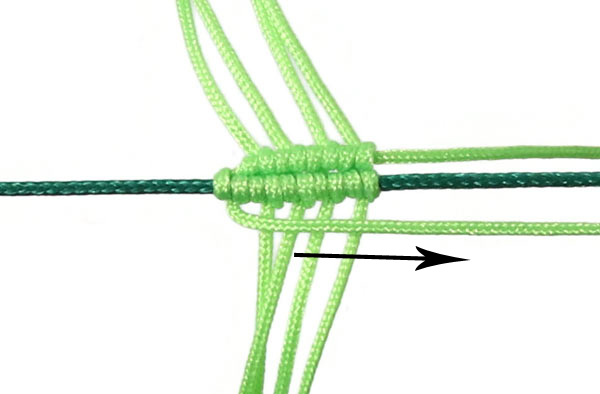
Continue like this ... and tie the next 4 red cords around the centre cord using double knots. Once you are done, you have 6 red cords tied around the pink cord in total.
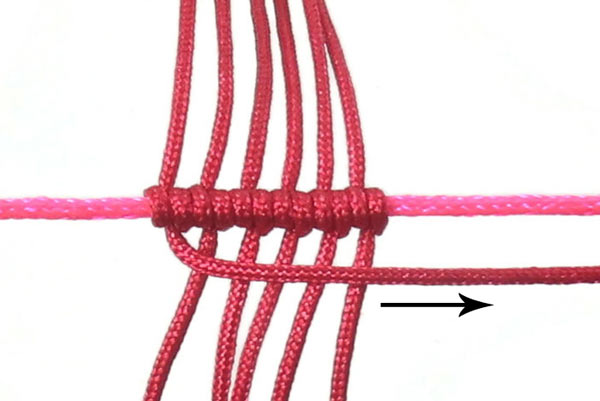
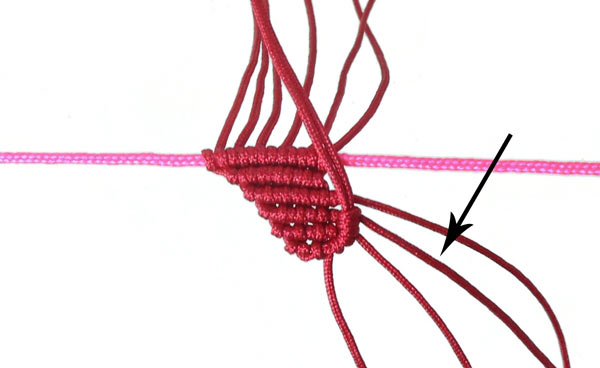
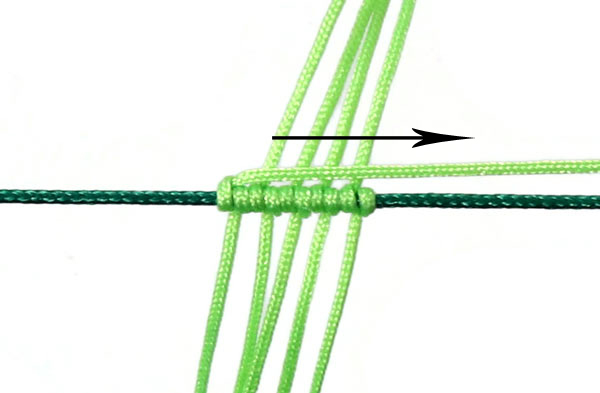
Take the first cord from the left and place it over the others ... parallel to the centre cord. Now we will tie knots around this cord. From now on, we will call it the anchor cord.
Tie a half knot with the second cord from the left ... around the anchor cord (see picture).
Tighten the knot.
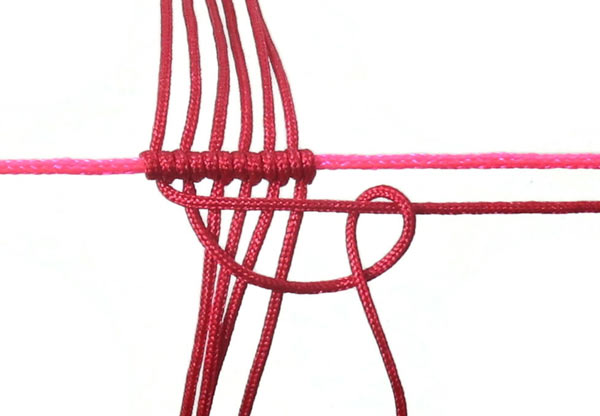
Tie another half knot with the same cord.
Tighten it.
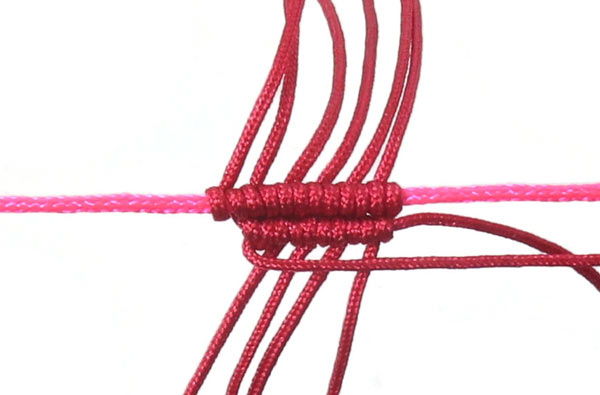
Take the next cord and tie a double knot around the centre cord.
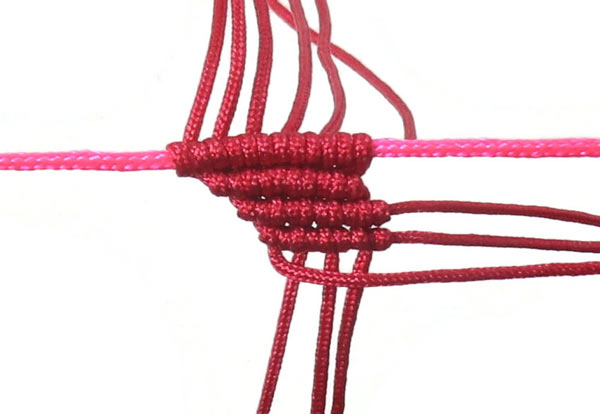
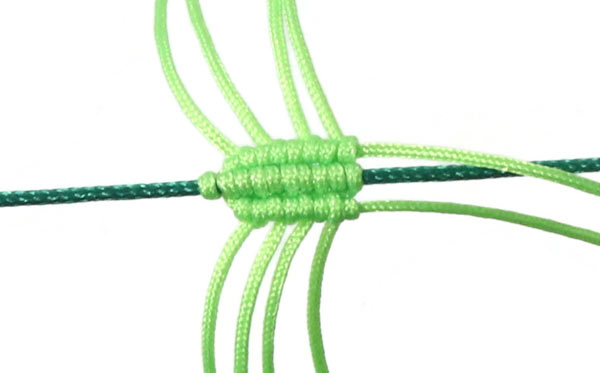
Continue like this ... tying a double knot with each cord ... around the anchor cord.
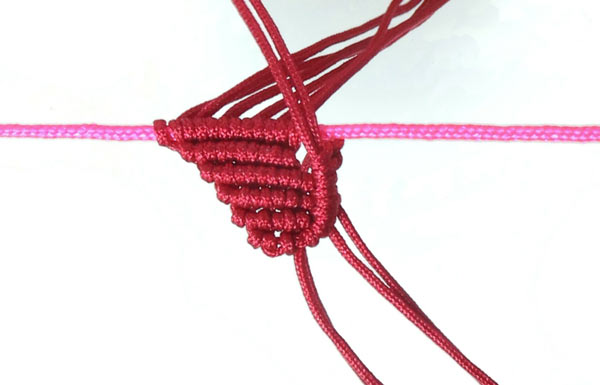
The first row is done.
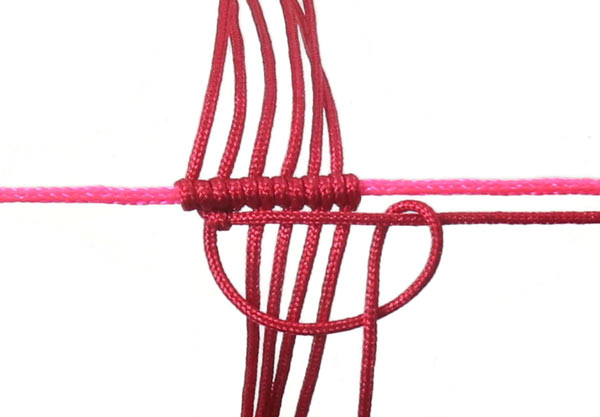
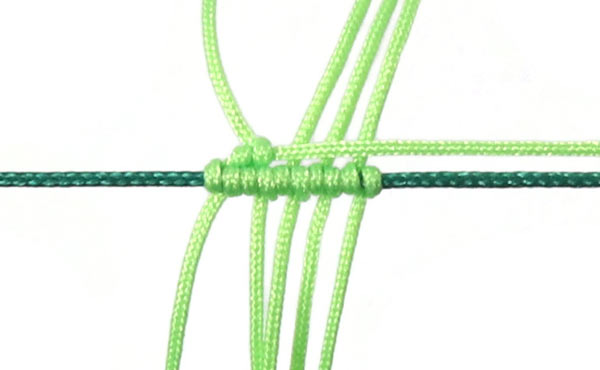
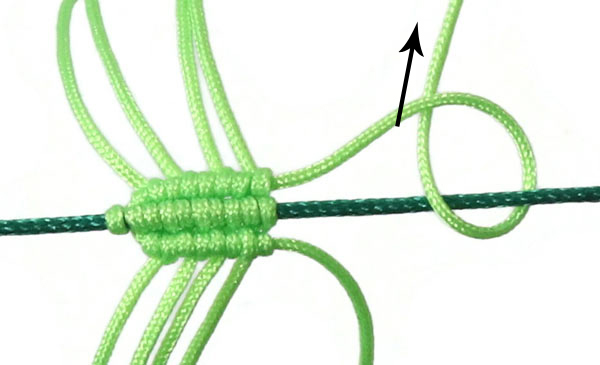
Take the first cord from the left and place it over the other cords ... parallel to the first row.
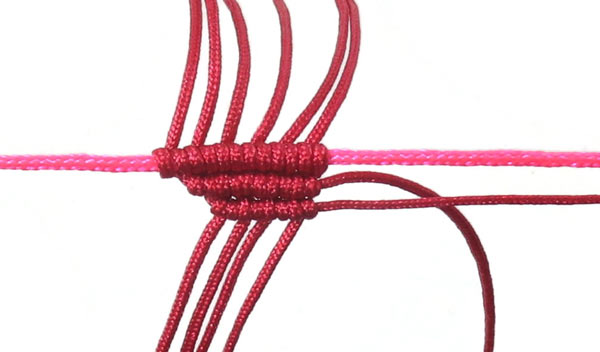
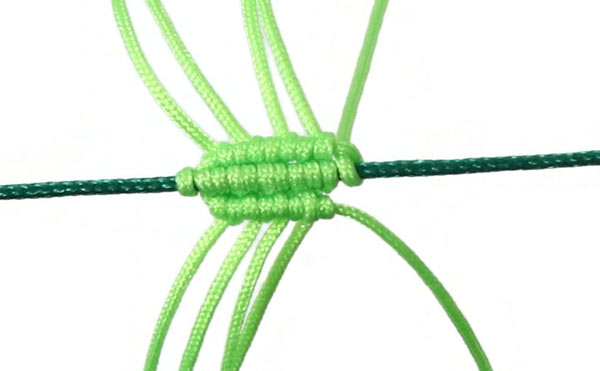
Tie a double knot with each of the 4 red cords.
Tie a knot with the former anchor cord, too. Now there are 5 double knots around the anchor cord.
The first cord from the left becomes the new anchor cord.
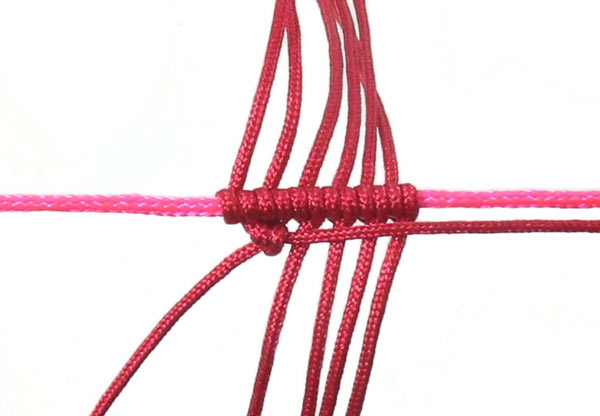
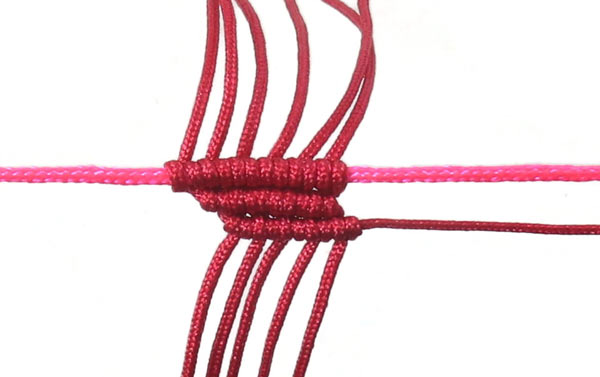
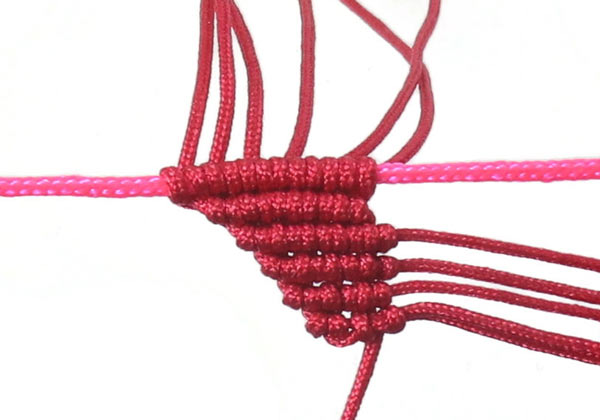
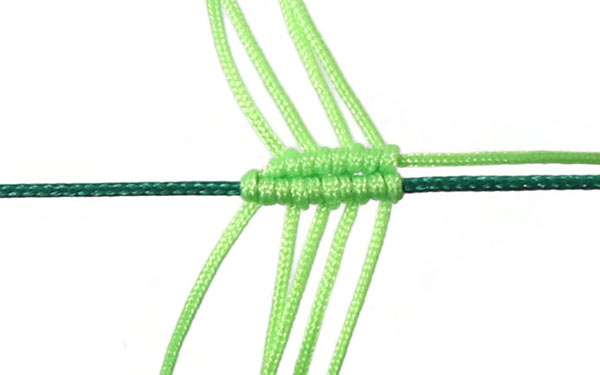
Tie the third row in the same way...
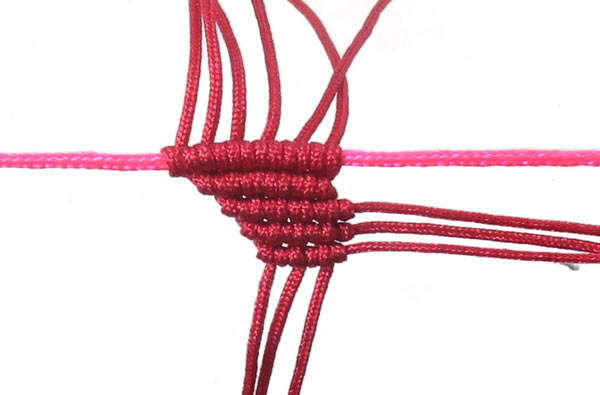
... and the fourth row as well.
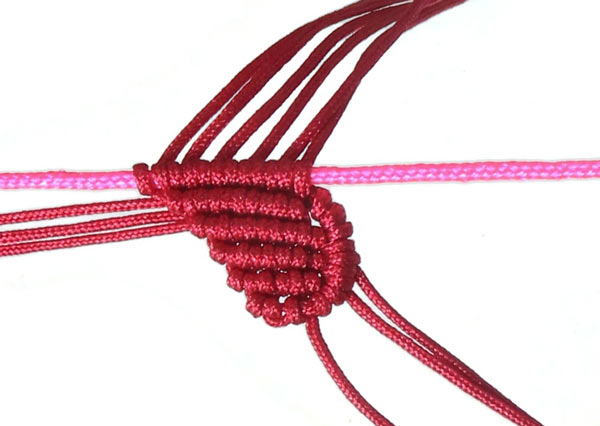
Tie 1 double knot in the fifth row.
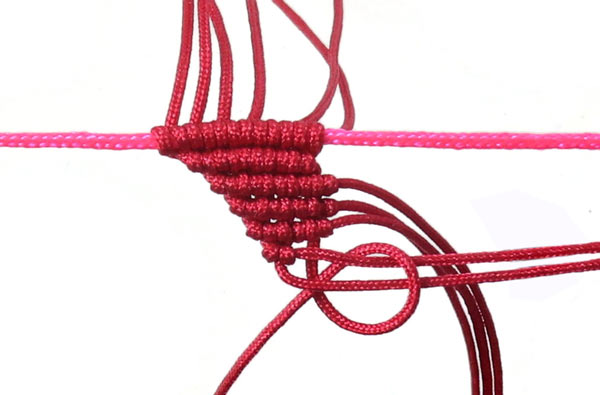
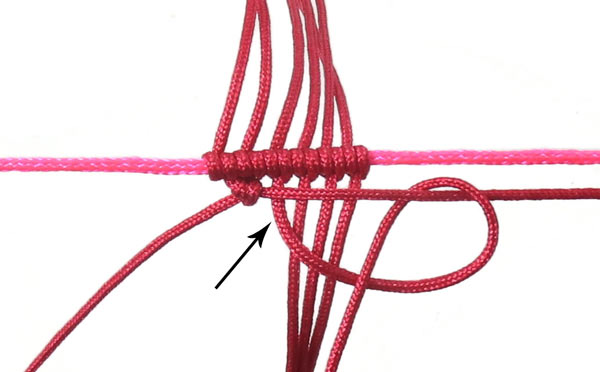
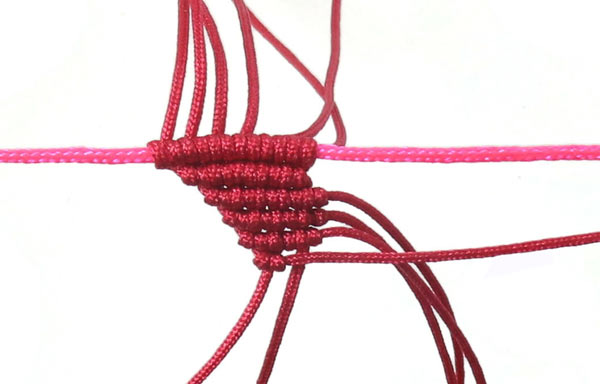
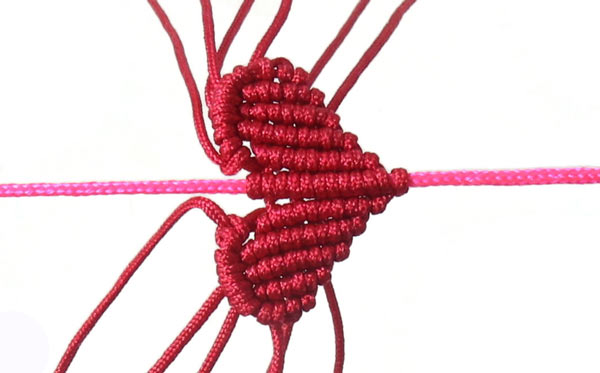
Now you are going to make the edge of the heart. Tie the next double knot arount 2 anchor cords (see picture).
Tighten the cord.
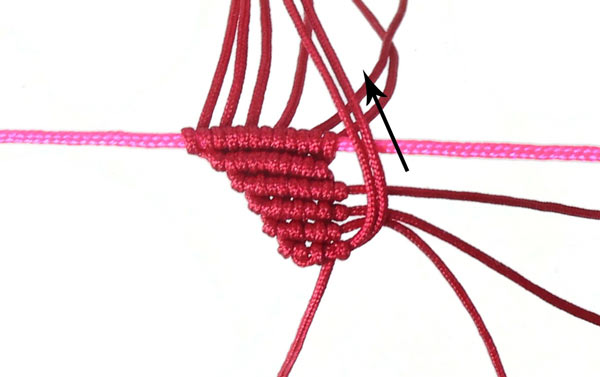
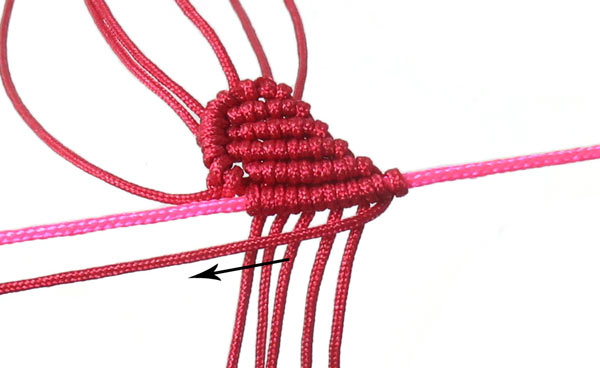
Place the 2 anchor cords upwards (see picture)...
... and tie a double knot with the next cord.
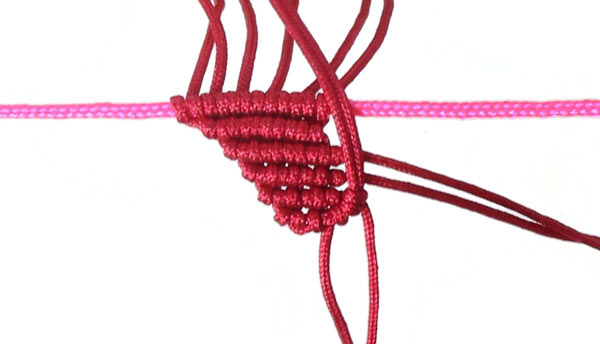
Tie a double knot with the next cord...
... and one more double knot with the last cord.
The first half of the heart is done.
Knot the other half of the heart in the same way.
Now the other half of the heart is done.
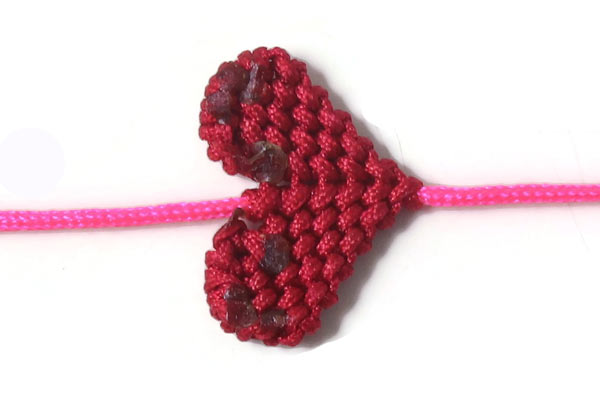
Turn the heart around. Cut off all the loose ends and singe them.
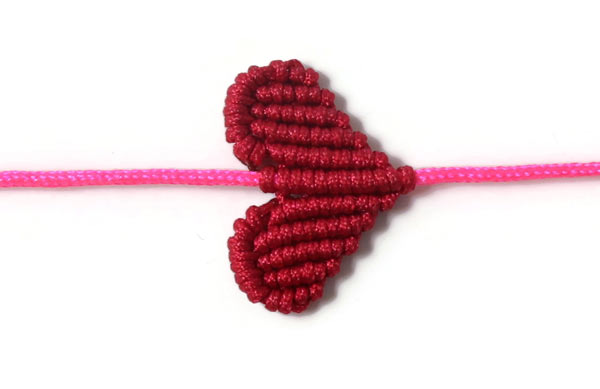
The heart is done.
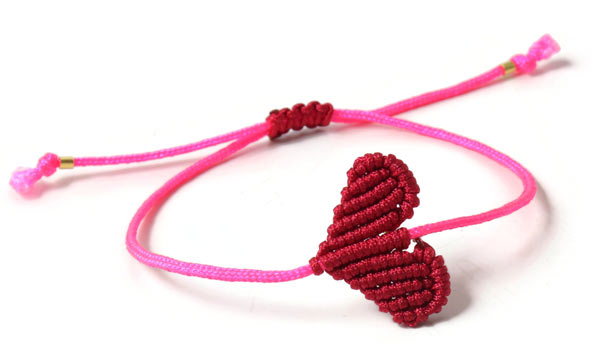
We finished our bracelet with a macramé closure and crimp beads as decoration at the ends.
Here you can find the instrucions on how to knot a marcamé the closure.
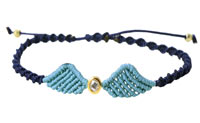
Macramé Angel Wings
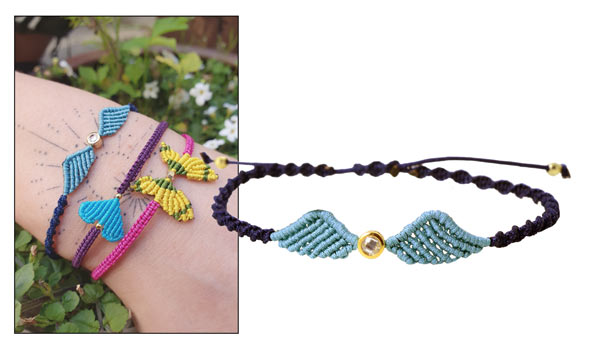
We used the following DIY components to make this bracelet:
Nylon cord, navy blue, 0.5mm, approx. 2m
Nylon cord, sea green/blue, 0.5mm, approx. 3m
Bead with crystal, 4mm, gilded sterling silver, 1 pc.
Disco ball beads, 3mm, gilded brass, 2 pcs.
+ Scissors
+ Lighter
The terms half knot, double knot, centre cord and anchor cord are explained in the first example "Macramé Heart".
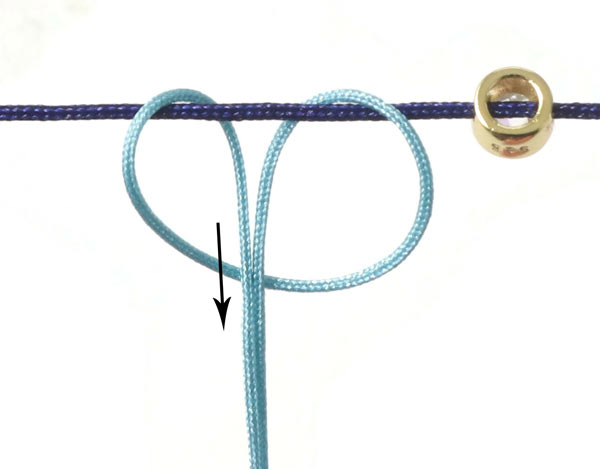
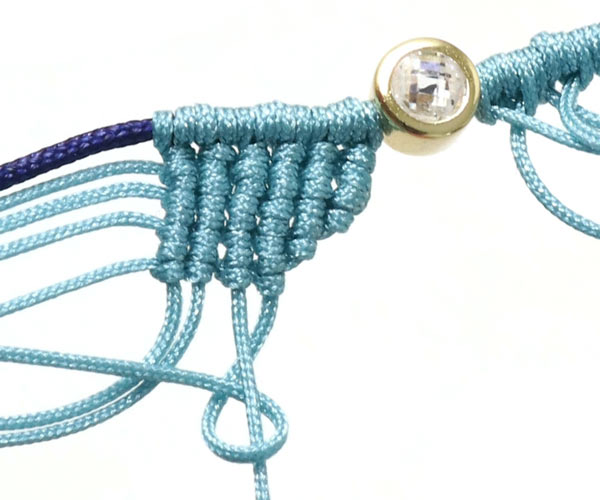
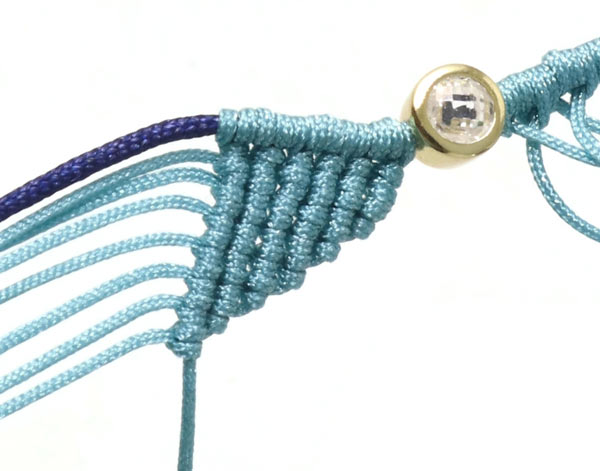
First, you stretch and fasten the navy blue cord as centre cord on the braiding loom. String the golden bead.
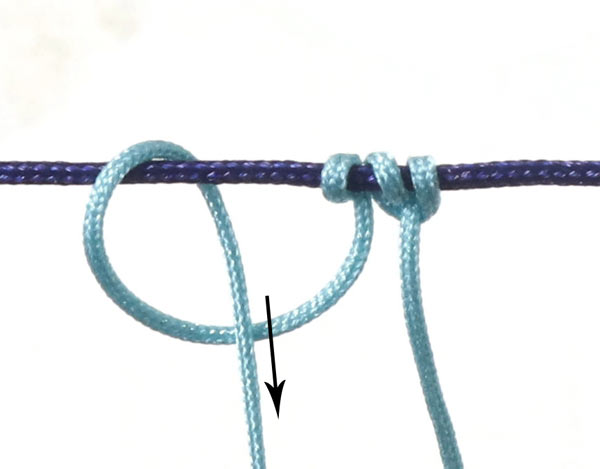
Cut 8 x 35cm sea green / blue cord to size. Take the first blue cord and fold it in the middle. Place it around the centre cord as shown in the picture.
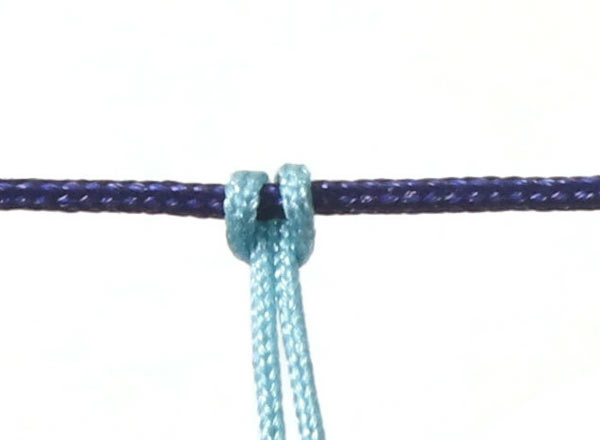
Tighten the cord.
Tie a half knot around the centre cord ... to the right of the knot (see picture).
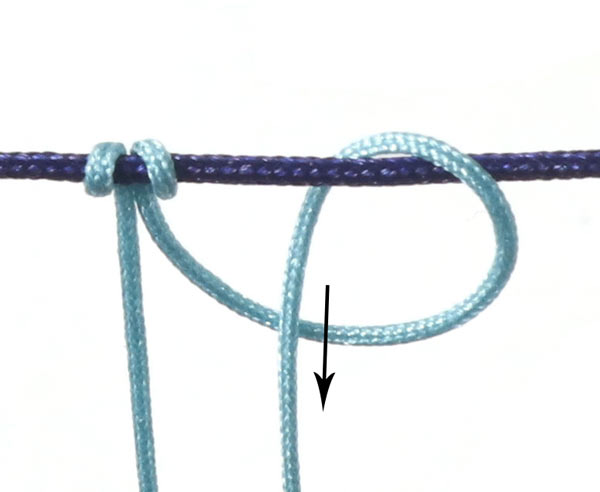
Tie another half knot around the centre cord ... to the left of the knot (see picture).
From now on, we will call this a double half knot.
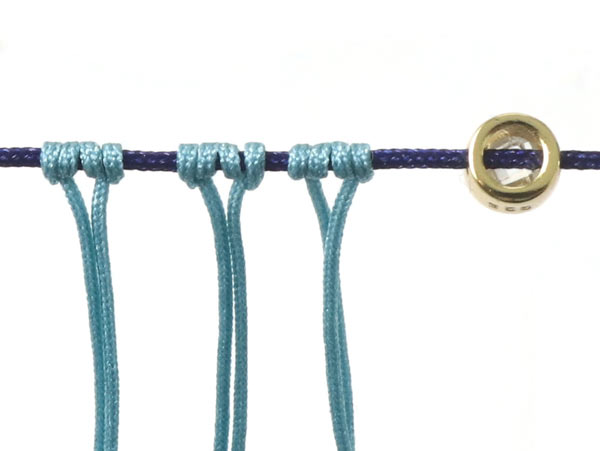
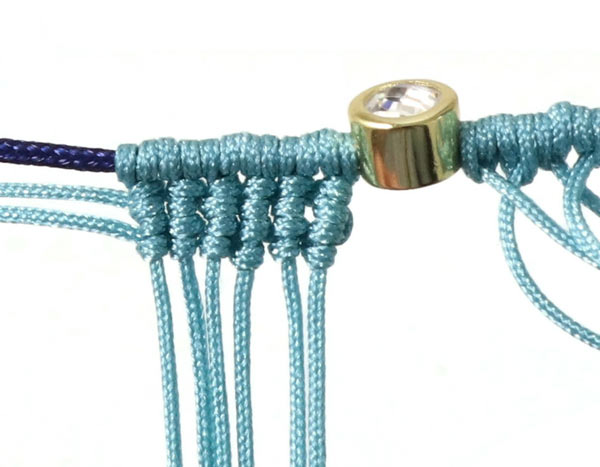
Tighten the cord. Tie a double half knot with the next 2 cords.
Tighten them ... and push the knots close to the bead.
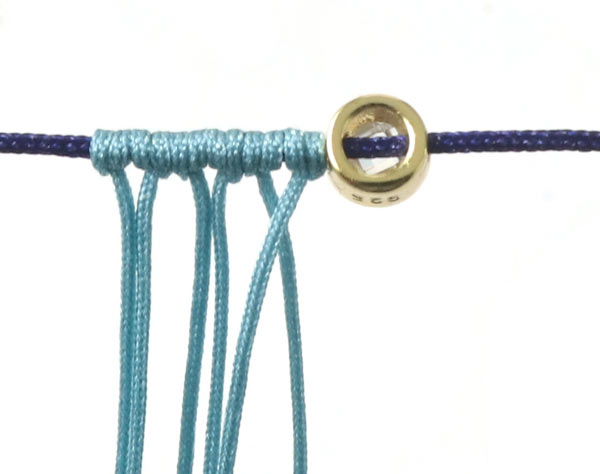
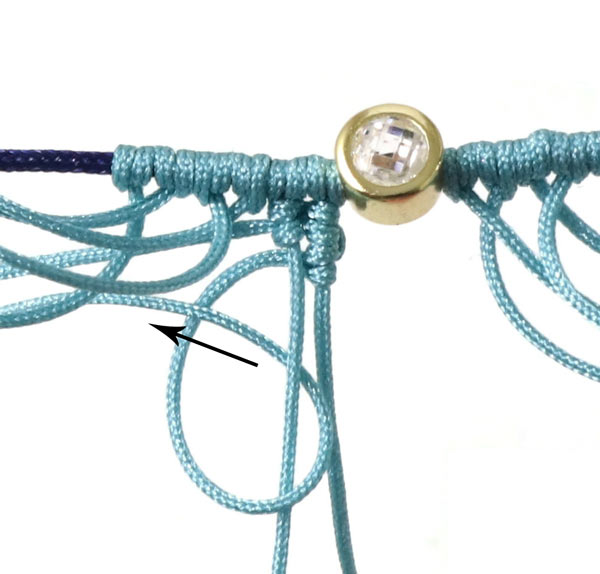
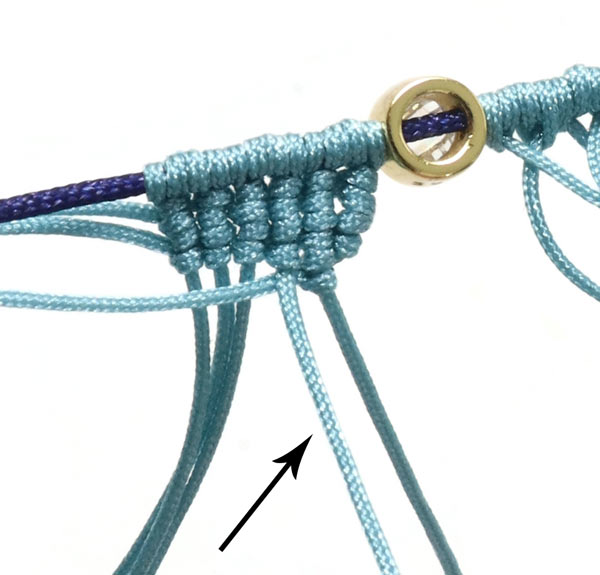
Then you tie 3 double half knots on the other side of the bead.
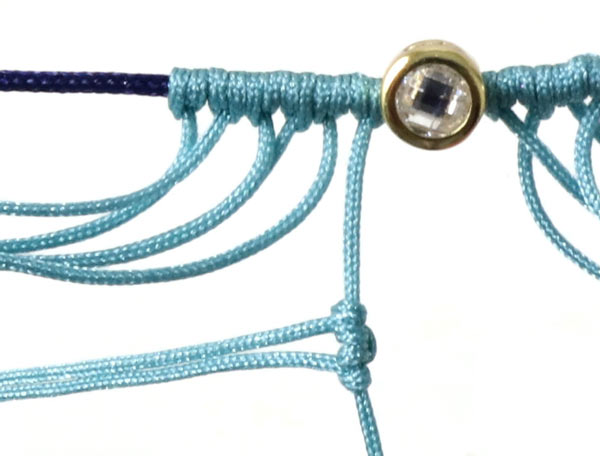
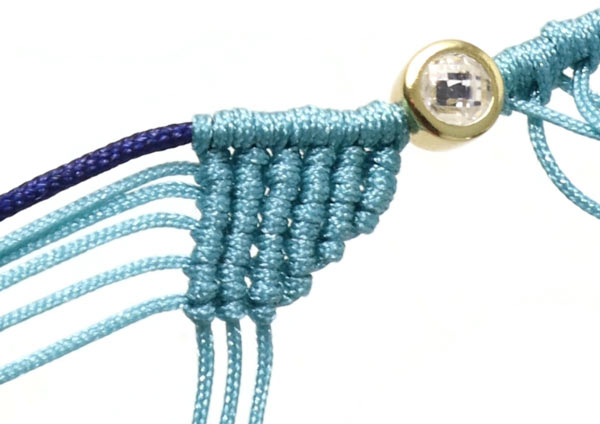
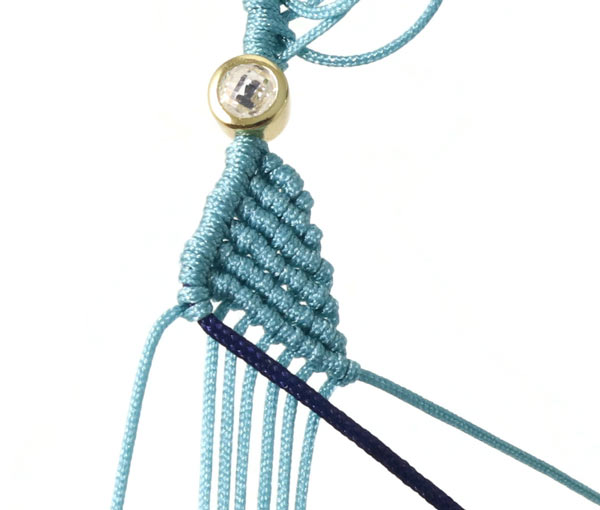
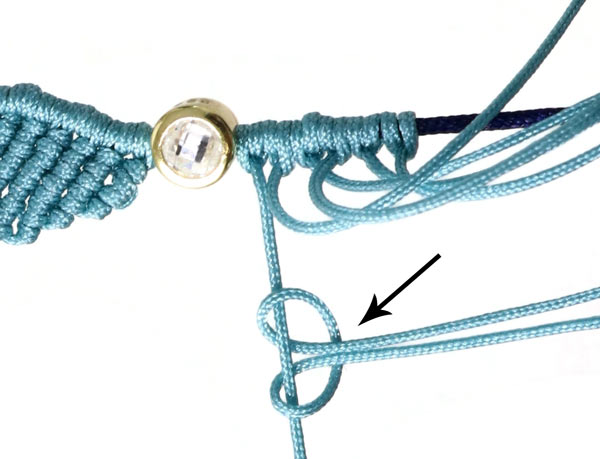
Take a new cord and tie a double half knot around the cord left from the bead in the middle.
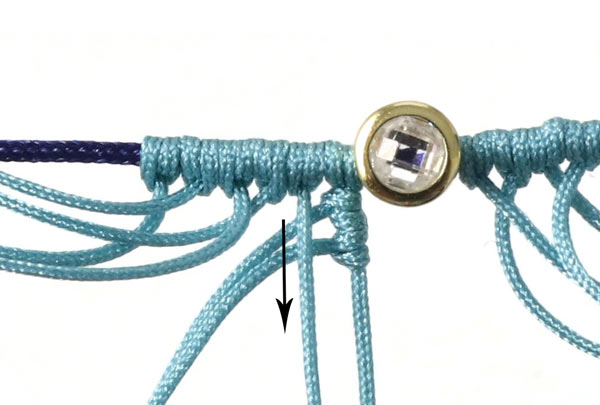
Tighten the knot ... and push it all the way up to the centre cord. Place the second cord over the cord ends (see picture).
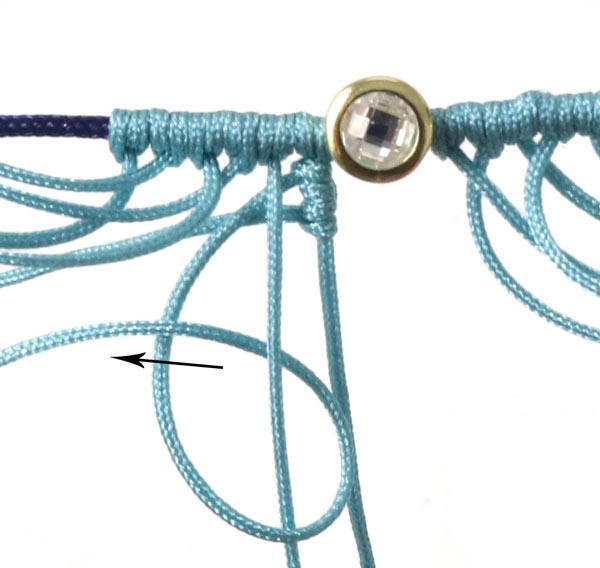
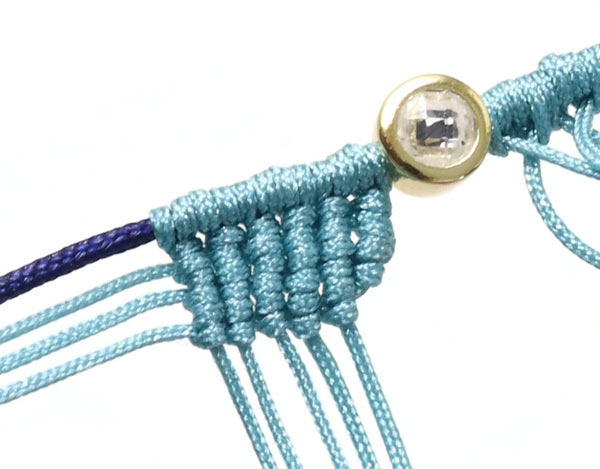
The second cord is the new anchor cord. Tie a half knot around it (see picture).
Tie another half knot = double knot.
Tie a double knot with the cord beside it (see picture).

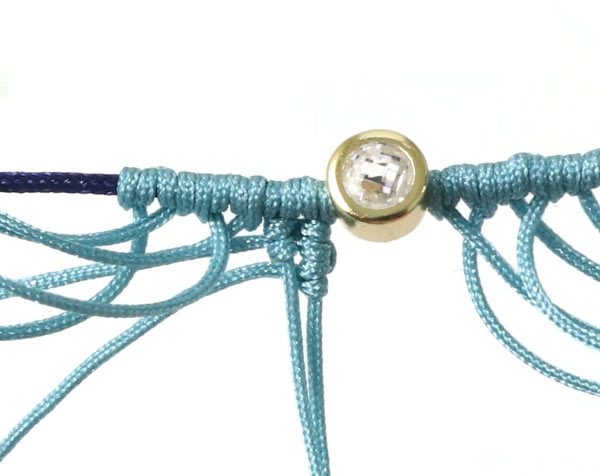
Tie 2 double knots around the next cord.
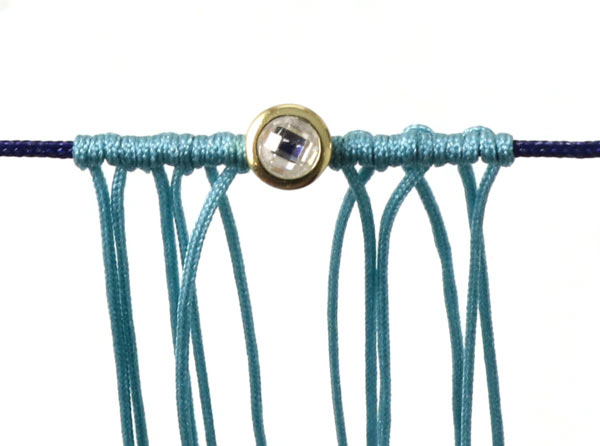
Tie 2 double knots around the last 3 cords.
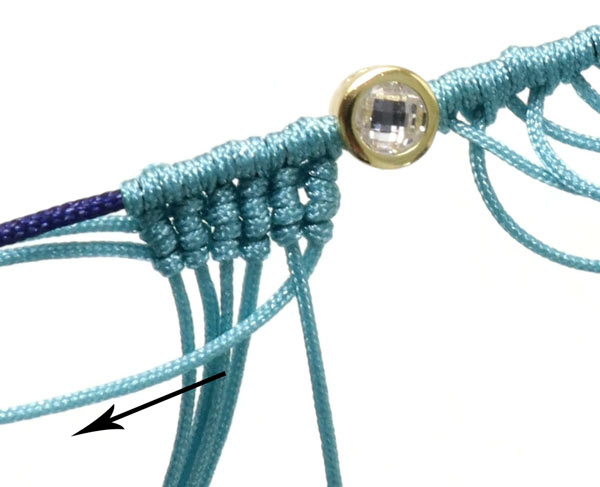
Place the cords as shown in the picture.
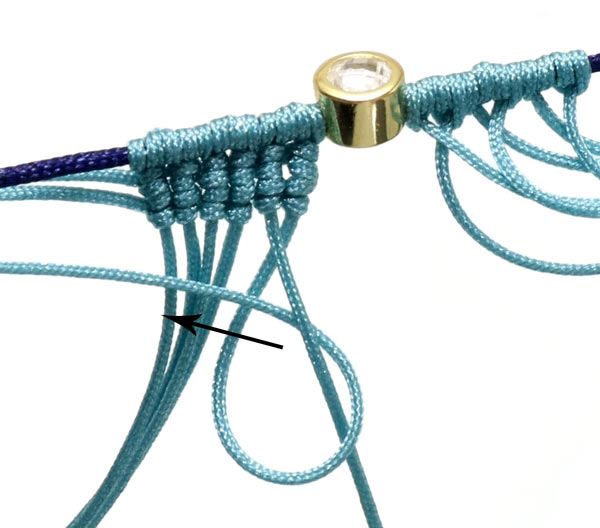
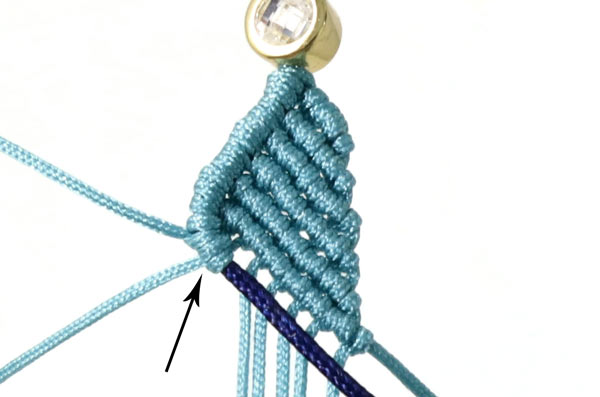
Tie a double knot around the second cord from the right (left from the bead).
Tighten the knot ... and tie a double knot around the 3. cord (see picture).
Continue tying 1 double knot around every cord.
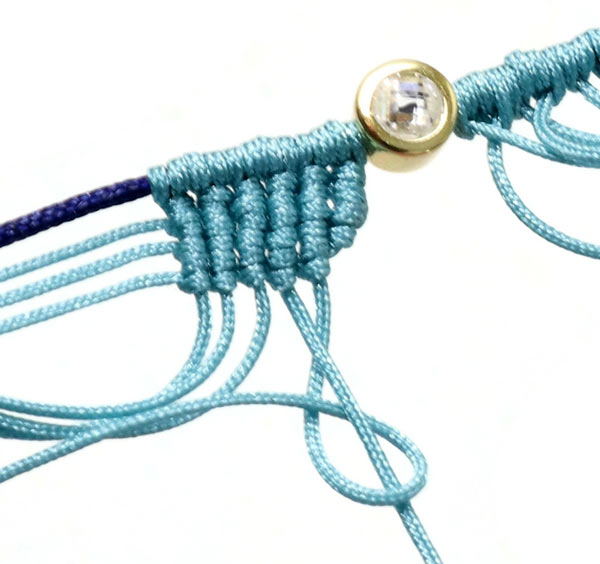
Take the cord to the right and tie double knots around the cord next to it.
Tie a double knot around each of the other 3 cords.
Knot the next row in the same way.
Tighten the cord.
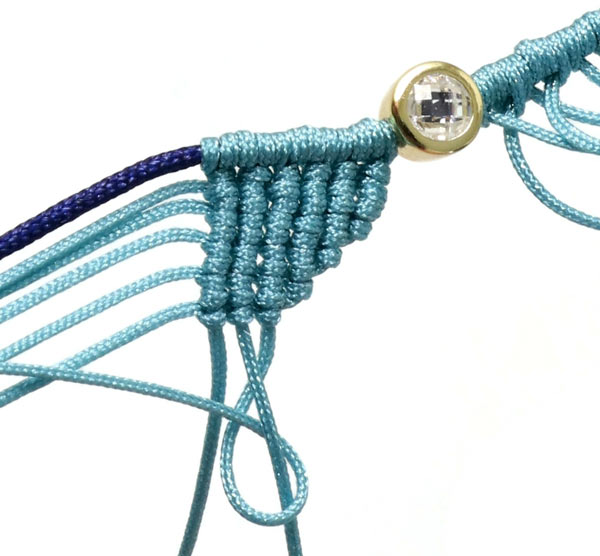
Then you knot the next row in the same way...
... and the last row, too.
Tighten the cord.

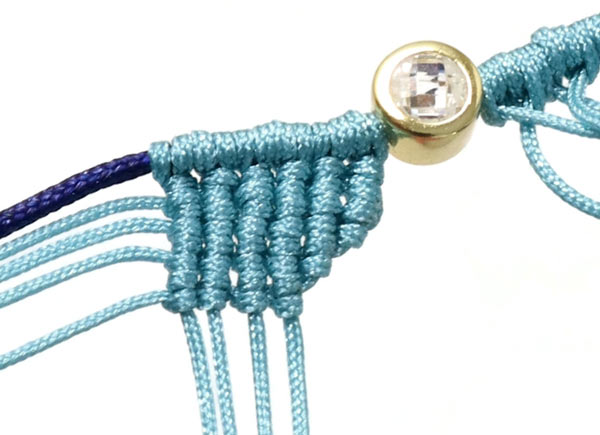
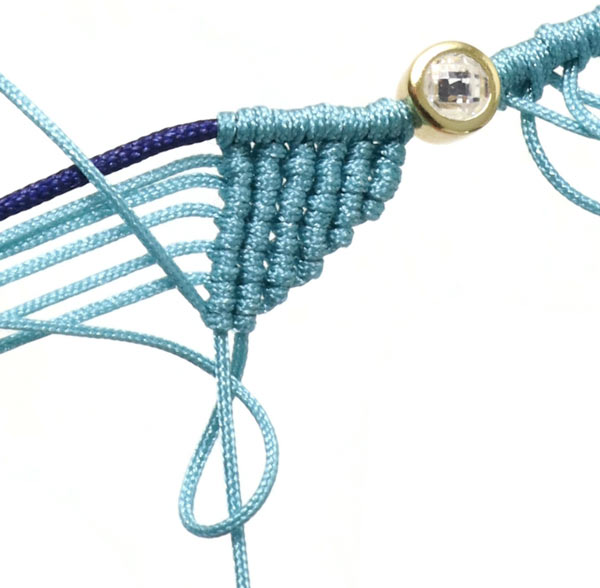
Pull the centre cord down so it is parallel to the last anchor cord.
Tie a double knot with the cord on top.
Tie a double knot with the next cord.
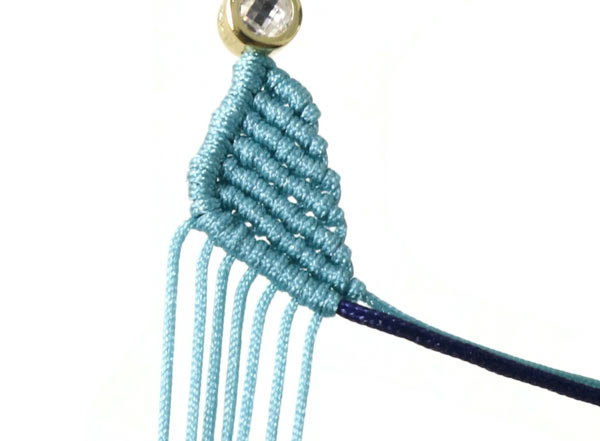
Continue like that and tie double knots with the remaining cords.
Knot the other angel wing in the same way.
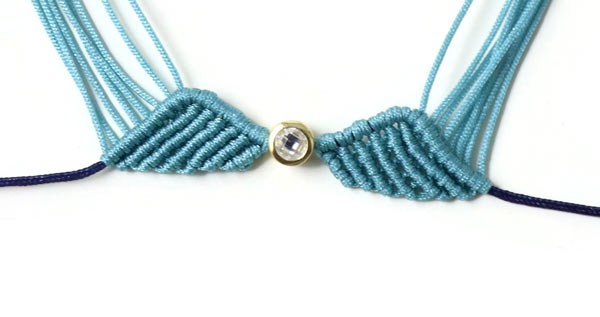
Now, both wings are done.
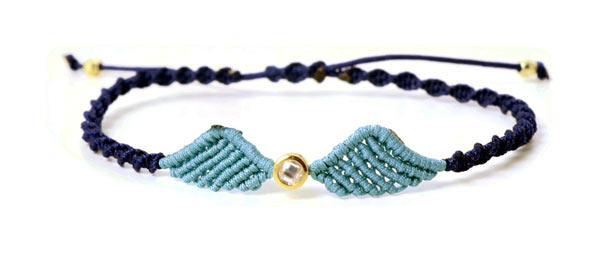
Cut off and singe all the blue cord ends. For our example, we used the classic macramé technique. If you keep knotting from the same side, it will twist automatically.
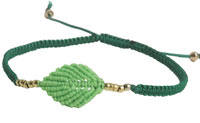
Macramé Leaf
We used the following DIY components to make this bracelet:
Nylon cord, summer green, 0.5mm, approx. 2m 5x35cm
Nylon cord, bottle green, 0.5mm, approx. 2m
Crimp beads, 1.5x2mm, gilded brass
Fluted bicone beads, 3mm, gilded brass
+ Scissors
+ Lighter
The terms half knot, double knot, centre cord and anchor cord are explained in the first example "Macramé Heart".
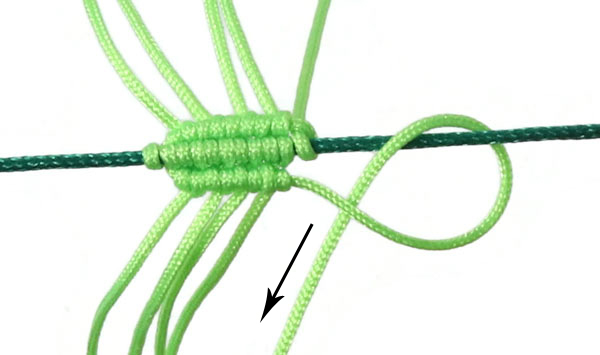
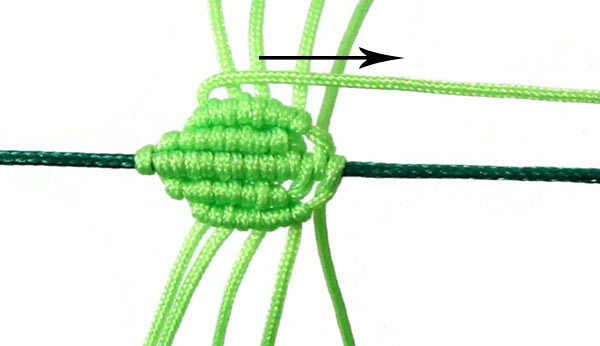
Stretch and fasten the bottle green cord on the braiding loom as centre cord. Tie 1 double knot with each of the five pieces of summer green cord.
Place the (upper) cord on the left over the other cords - parallel to the centre cord.
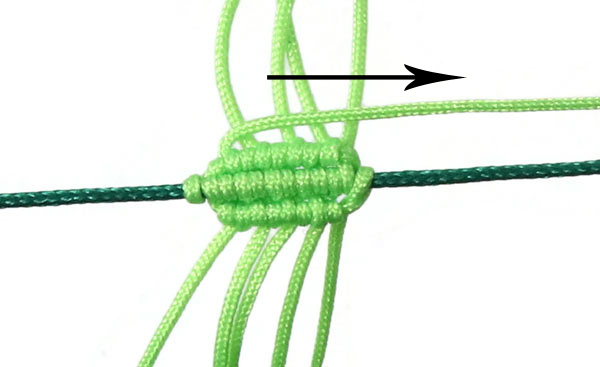
Take the cord next to it and tie a double knot.
Tie a double knot with each of the remaining 3 cords.
Now you take the other cord on the left (underneath the centre cord) ... and place it over the other cords - parallel to the centre cord.
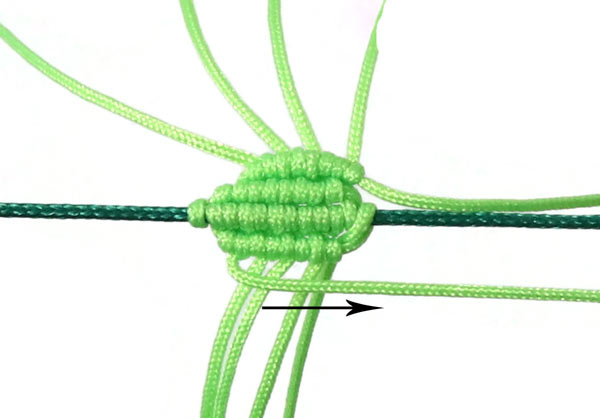
Take the next 4 cords - one after the other - and tie a double knot with each of them.
Tie one more half knot with the upper anchor cord (see picture).
Tighten the cord.
Tie a half knot with the anchor cord at the bottom (see picture).
Tighten the knot. The upper cord to the left is now going to be the next anchor cord.

Tie a double knot with each of the next 4 cords (see picture).
After that, the lower cord on the left becomes the new anchor cord.
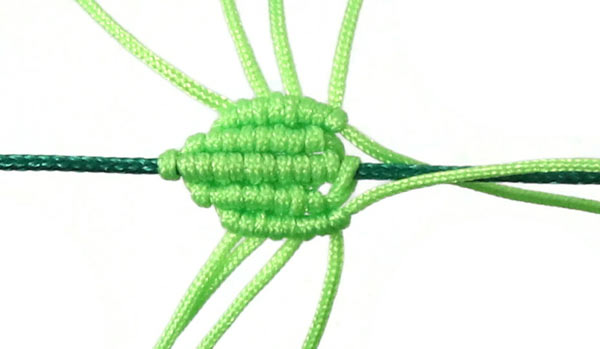
Tie a double knot with each of the 4 cords next to it (see picture).
Continue like this ...

... until there are 6 rows on either side of the centre row.
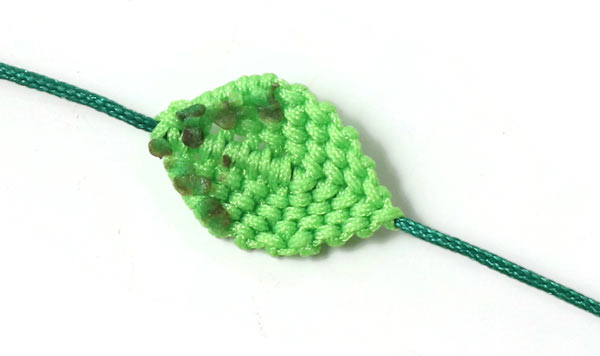
Turn the leaf ... cut off and singe the cord ends.
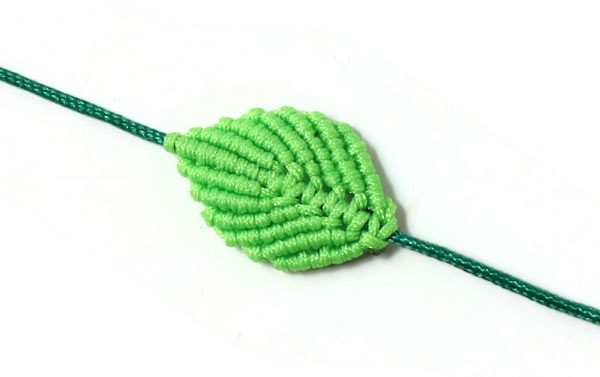
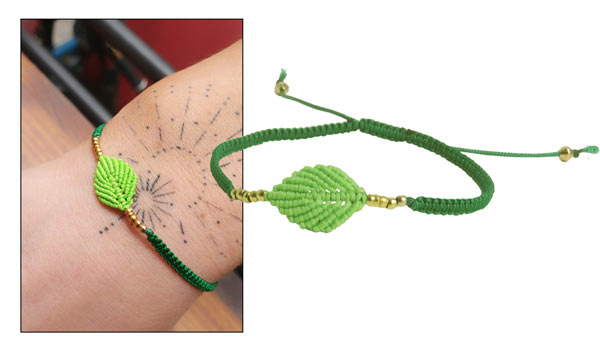
The leaf is done.
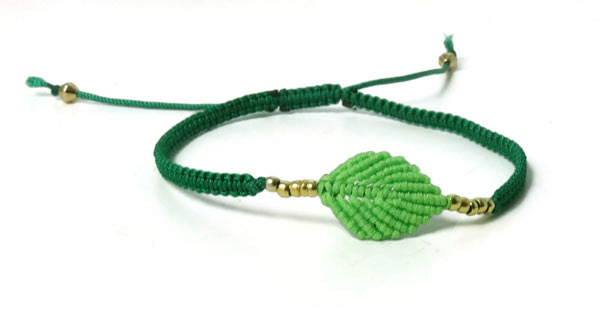
For this example, we decorated the bracelet with 5 crimp beads on either side of the leaf and with one bicone bead at each end.
Macramé Butterfly
We used the following DIY components to make this bracelet:
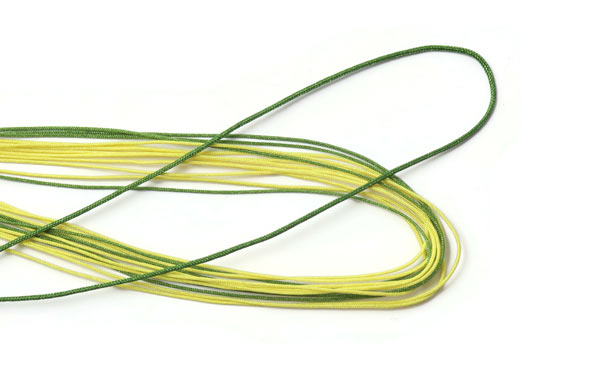
Nylon cord, sun yellow, 0.5mm, 8x30cm
Nylon cord, khaki green, 0.5mm, 5x30cm
Nylon cord, hot pink, 0.5mm, 2m
Disco ball beads, 3mm, gilded brass, 3 pcs.
+ Scissors
+ Lighter
The terms half knot, double knot, centre cord and anchor cord are explained in the first example "Macramé Heart".
 You start with cutting the cords to size:
Green cord: 5 x 30cm (one of these is going to be the centre cord)
Yellow cord: 8 x 30cm
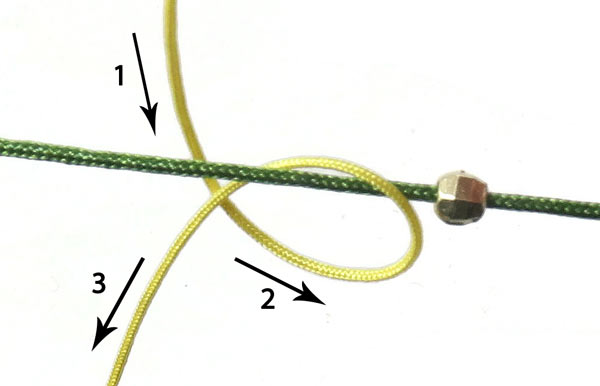
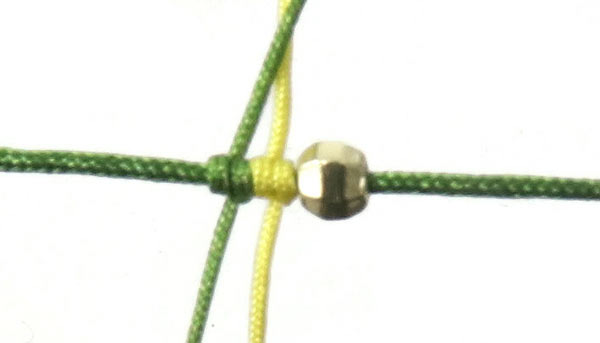
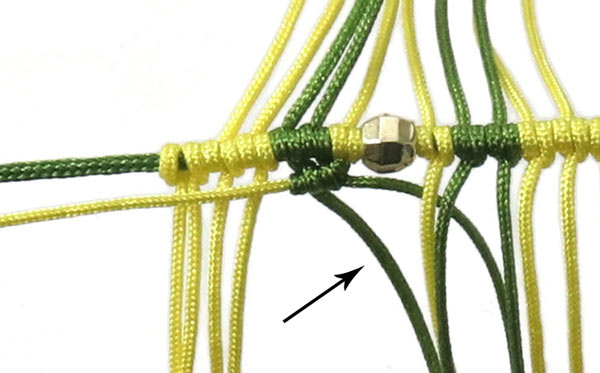
Stretch and fasten one of the green cords on the braiding loom as the centre cord. String a golden bead.
Tie a half knot with a yellow cord.
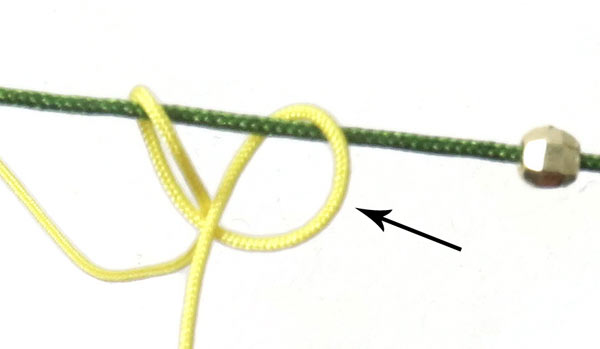
Tie another half knot ...
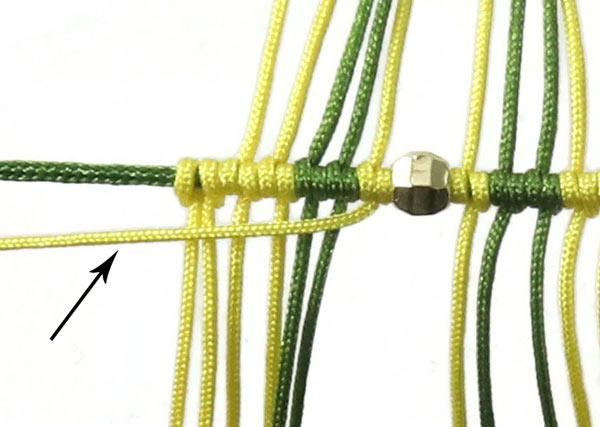
... and tighten it. Now the first yellow double knot is done. Tie one more double knot with a green cord...
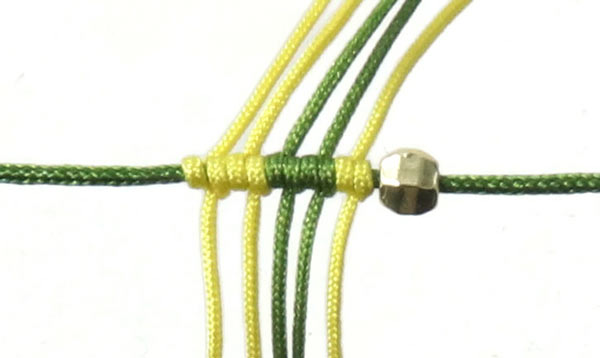
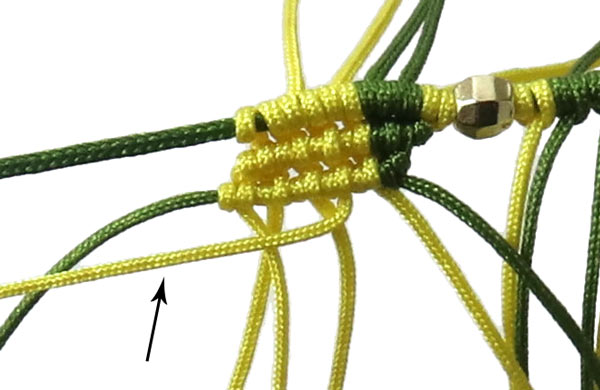
... and another double knot with a green cord. After that, you take two yellow cords and tie a double knot with each of them (see picture).
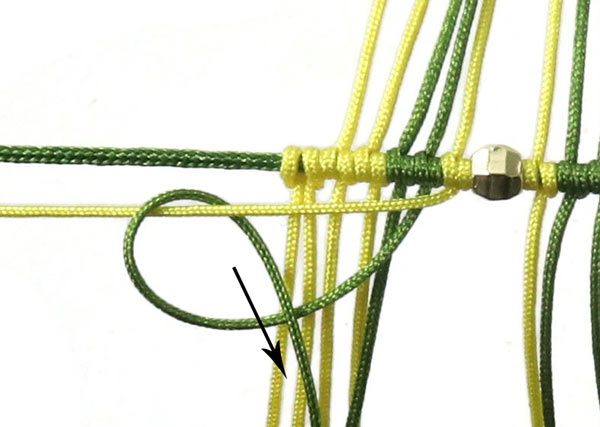
Fold the last yellow cord around the centre cord as shown in the picture ... and tighten it.
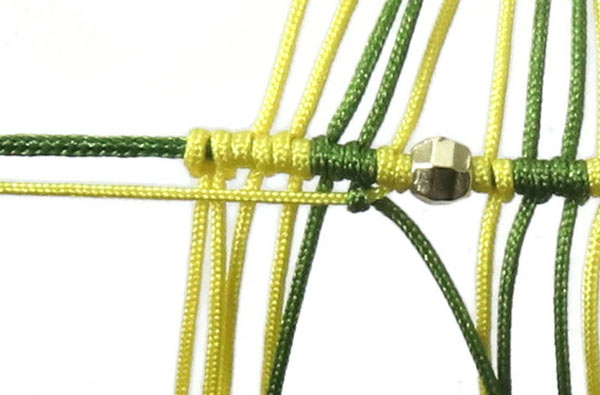
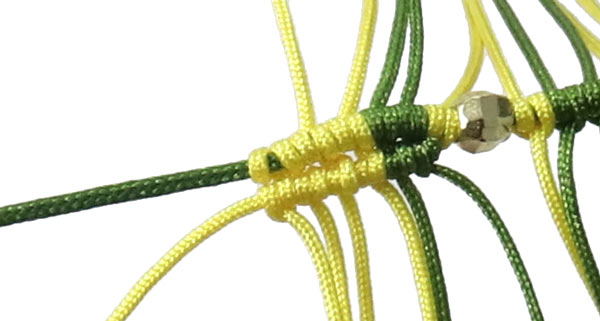
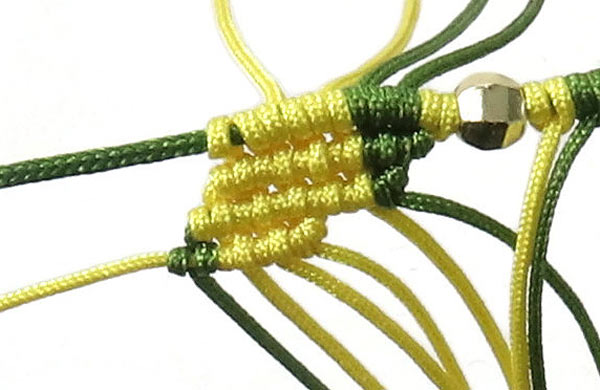
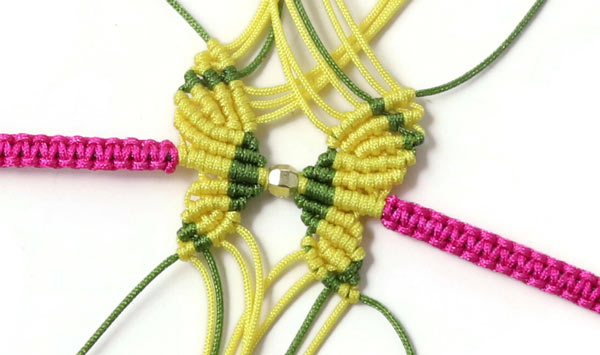
Tie the same knots on the other side of the centre cord (see picture).
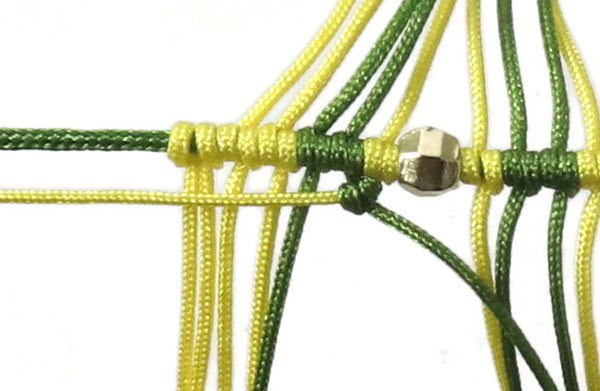
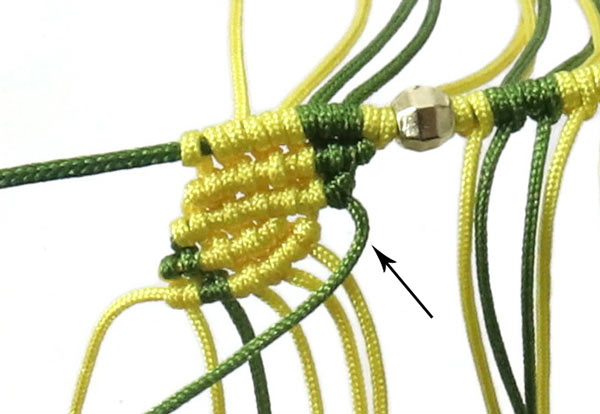
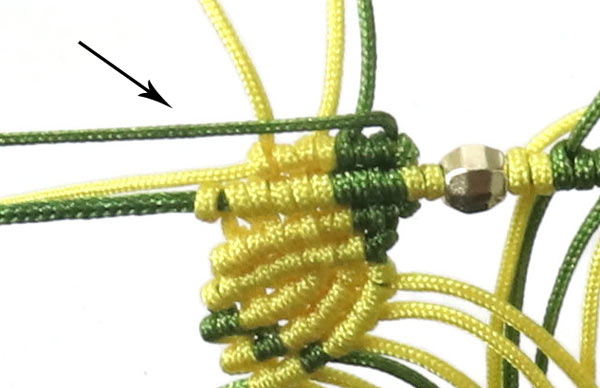
First, you knot the left part of the butterfly - left from the bead in the middle.
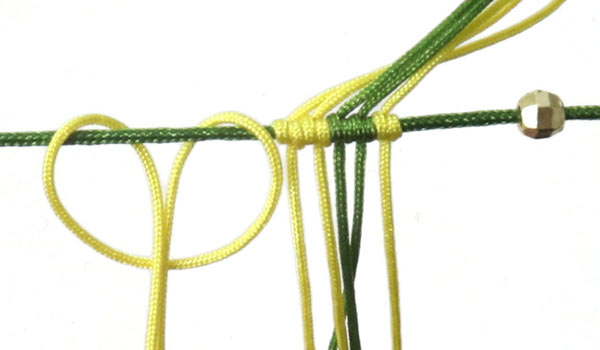
Pull the yellow cord from the right to the left so it is placed parallel to the centre cord. This is the first anchor cord - the one the other cords are tied around.
Take the green cord next to it and tie a half knot around the anchor cord.
Tighten it.
Tie one more half knot ... and tighten it. The first double knot is done.
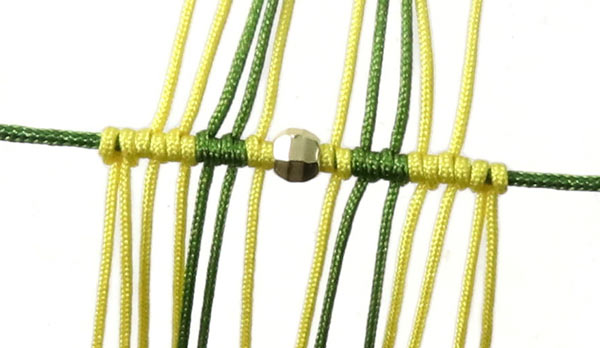
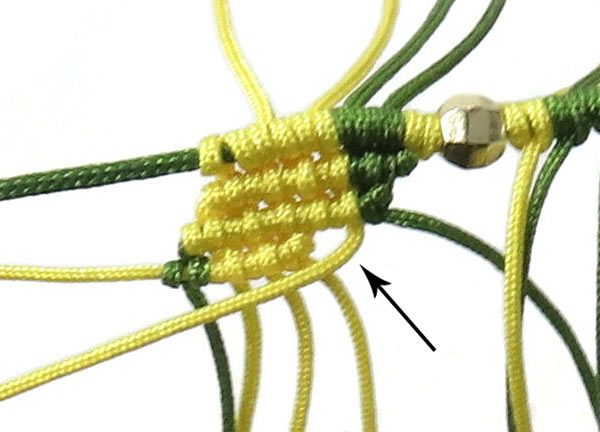
Tie a double knot with the next green cord.
Continue like that with the remaining cords (see picture).
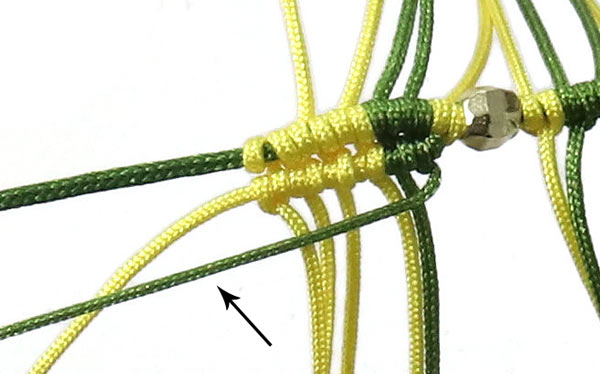
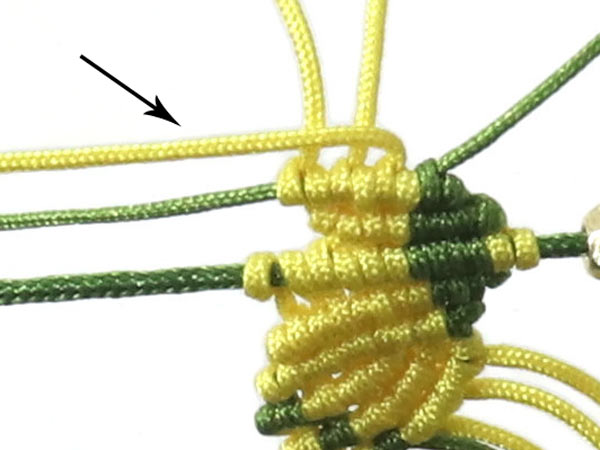
Now you place the green cord on the right parallel to the centre cord. This is the new anchor cord.
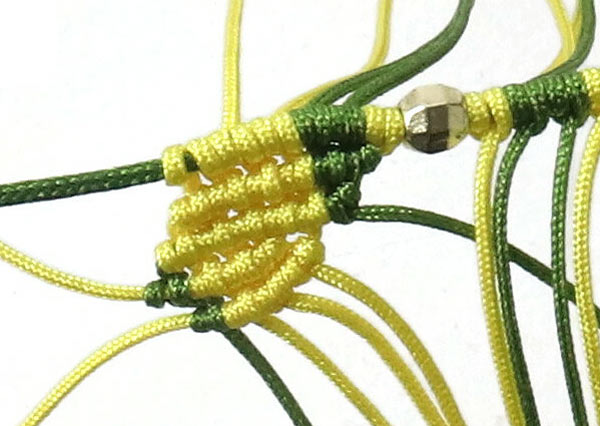
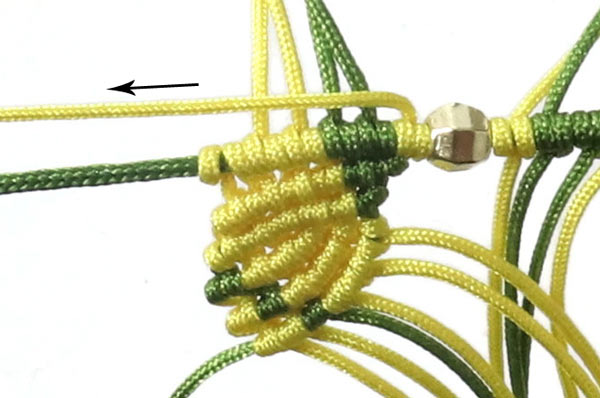
Knot the next row in the same way. You also tie a double knot with the last yellow cord (the former anchor cord).
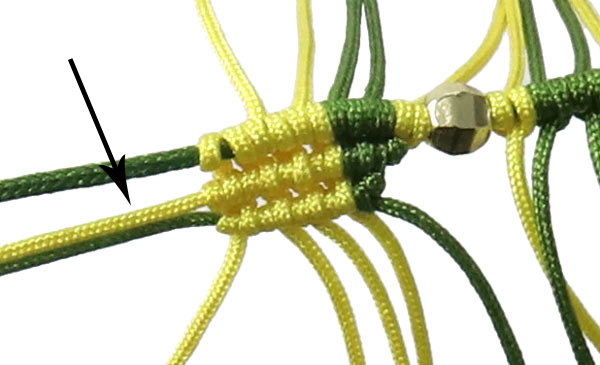
After that, you skip the first 2 cords ... and make the second yellow cord from the right the new anchor cord.
Knot the third row in the same way.
The next anchor cord is the yellow one to the right.
Knot the fourth row in the same way.
The new anchor cord is the green one to the right. 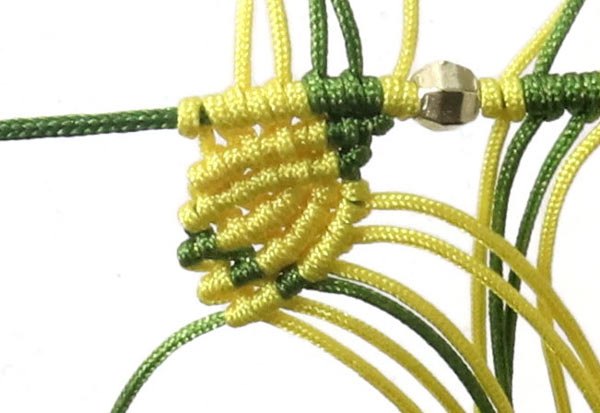
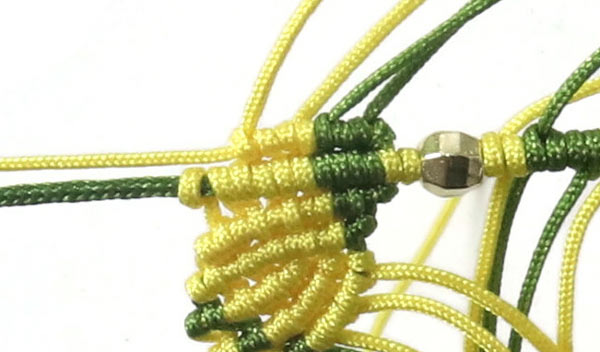
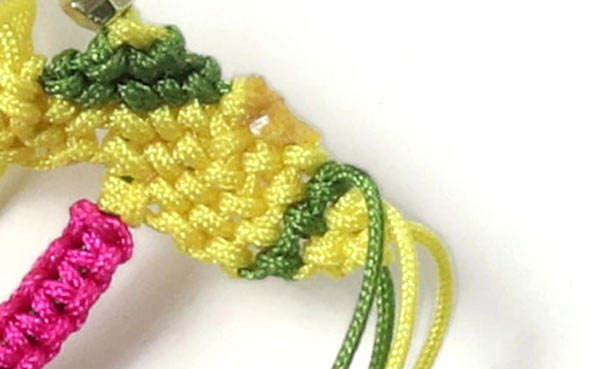
Knot the fifth row in the same way. Now, the lower part of the wing is done.
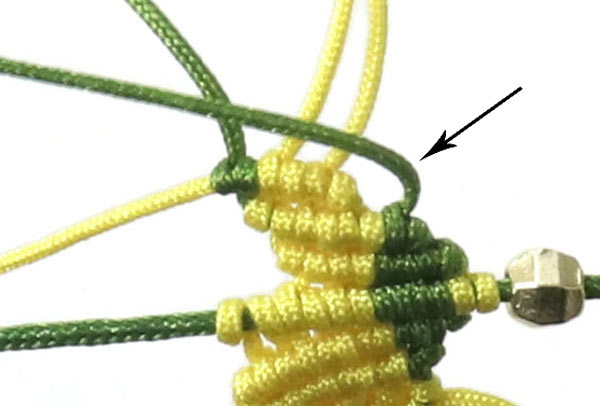
Next, you knot the upper part of the wing.
The yellow cord to the right is the first anchor cord.
Knot this row in the same way - with double knots.
The next anchor cord is the green one on the right. Knot the second row in the same way.
Skip the green cord to the right ... the next anchor cord ist the yellow one beside it.
Knot the third row. After that, the green cord to the right is the new anchor cord.
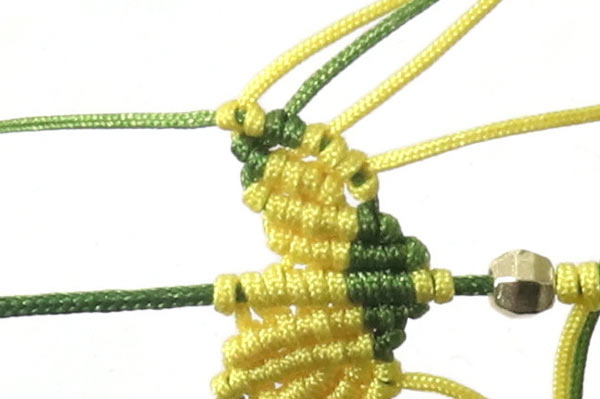
Knot the last row.
Knot the other side of the butterfly in the same way. For our example, we used the classic macramé technique for the bracelet - with pink cord around the centre cord.
Turn the butterfly. Cut off and singe the cord ends ... so they disappear one after one.
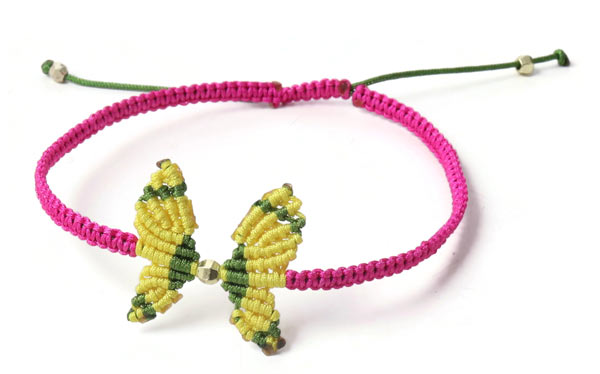
We knotted a macramé closure with pink cord and decorated each centre cord end with a small disco ball bead.
Now, you pretty little butterly bracelet is done.
We will publicly show your name and comment on this website. Your email is to ensure that the author of this post can get back to you. We promise to keep your data safe and secure.